OPC UA Server
The standard installation of CODESYS Communication includes an OPC UA Server. You can extend your project to include this by first selecting the Communication Manager object below the application and then below that adding the OPC UA Server object.
You can use the OPC UA Server object to establish a connection via a client and then access the variable interface of the controller. The OPC UA Server communicates with connected OPC UA Clients via a separate TCP connection. For this reason, the security of these connections must be checked again separately.
The OPC UA Server can now be safeguarded by using encrypted communication to the client and OPC UA user management. You will find the possible settings for this in the following sections:
Important
In runtime version 3.5 SP17 and higher, a device user management has to be set up by default for access to the CODESYS runtime systems. However, for the OPC UA Server it is possible to continue to allow anonymous access if this is explicitly permitted. This permission is granted in the Change Communication Policy dialog on the Communication Settings tab of the device editor.
Browsing of data types and variables
Standard read/write services
Notification for value changes: subscription and monitored item services
Encrypted communication according to "OPC UA standard (profile: Basic256SHA256)"
Imaging of the IEC application according to "OPC UA Information Model for IEC 61131-3"
Supported profile: "Micro Embedded Device Server Profile"
Number of sessions
By default, monitored items and subscriptions are not restricted. The number depends on the performance of the respective platform.
Sending of events according to the OPC UA standard
Communication with a data source OPC UA Client
For more information, see the following: Establishing the Connection of a Data Source OPC UA Client to an OPC UA Server
Tip
The OPC UA Client UAExpert is cited many times in this chapter. UAExpert is a product of the vendor "Unified Automation".
For more information, see the following: Unified Automation
When you create a IEC Symbol Set Configuration with the Communication Manager, OPC UA access is automatic.
Creating a project for OPC UA access
Create a new project with a CODESYS Control Win controller.
Declare some variables of different types in the program
PLC_PRG.Insert a Communication Manager object below the application.
If you want to exchange IEC variables of the application with other OPC UA Clients via the OPC UA Server, then add an OPC UA Server object below the Communication Manager object.
The next steps can be found under IEC Symbol Set Configuration.
If you want to publish data of an OPC UA information model, then add an OPC UA Information Model object below the Communication Manager object.
The next steps can be found under Using OPC UA Information Models.
Configuration and commissioning of the OPC UA Server
The OPC UA Server can be adapted to the requirements of different environments. A number of different security settings are available for this purpose. Changing these settings requires the PLC to be restarted. These values can be set by means of the Device Security Settings (OPC UA Server) of the PLC.
For more information, see the following: Using a Secure OPC UA Server
Configuration of the OPC UA certificates
In order to encrypt data and exchange it with the client safely, the server needs a certificate that the client must classify as "trusted" when a connection is established for the first time.
Requirement: The active path to the controller is set.
Install the CODESYS Security Agent add-on.
Click the command.
Select the Devices tab.
In the view on the left, select the controller.
In the right view, all services of the controller which require a certificate are displayed.
Select the OPC UA Server service.
Create a new certificate for the device. To do this, click the
 icon.
icon.The Certificate Settings dialog opens.
Define the certificate parameters and click OK to close the dialog.
The certificate is created on the controller.

Restart the runtime system.
When OPC UA Client certificates are generated via a trusted certification authority (CA = Certificate Authority), this CA must be configured as a trusted CA in the OPC UA Server. To do this, the CA must be installed under "Trusted Certificates".
To install certificate revocation lists (CRL: Certificate Revocation List) of the CAs, the following steps are required:
Transfer of the
CRLs per file transfer into thecert/importdirectoryExecution of the PLC Shell command
cert-importcrl
In case the client certificates are not signed directly by the trusted CA, but rather have a longer chain, then the certificates of the intermediate CAs have to be installed separately. They must be transferred to the OPCUAServer/Intermediate directory via file transfer. After the transfer, these certificates are automatically used by the OPC UA Server.
Note
In order to also set up an encrypted access to the OPC UA Server purely for browsing, a certificate can be created solely for this purpose in the Communication Settings dialog of the data source manager.
Specification-compliant configuration of the OPC UA Server
To operate the OPC UA Server according to the OPC UA specification, the following settings are required:
The City location has to be configured for the certificate.
An OPC UA Server certificate has to be generated
The CRL checks EnableCRLChecks have to be enabled.
The CommunicationMode has to be set to
MIN_SIGNEDorSIGNED_AND_ENCRYPTED.
Setting up an encrypted connection with the "UaExpert" client
The "UaExpert" OPC UA Client is freely accessible software that you can download from the Internet. You can use this client to connect to the CODESYS OPC UA Server. The following description refers to this program. Other OPC UA Clients work in a similar way.
Start the UaExpert program.
Click the command.
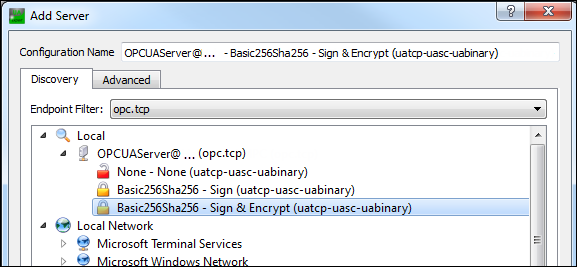
The Add Server dialog opens.
In the tree view, expand .
Select the connection type Basic256Sha256 – Sign & Encrypt (uatcp-uasc-uabinary) and click OK to close the dialog.

Click the command.
The Certificate Validation dialog opens with an error message.
Select the Accept the server certificate temporarily for this session option and click Continue.
In CODESYS, click the
 symbol.
The view is refreshed.
Select the Quarantined Certificates folder.
The UaExpert@ client certificate is displayed in the right view.

Drag the certificate to the Trusted Certificates folder.
Now the client certificate is classified as "trusted" by the server.
In the UaExpert client, click the command.
The Certificate Validation dialog opens with an error message.
Select the Accept the server certificate temporarily for this session option and click Continue.
The connection is established and objects are displayed in the Address Space view.
User management in OPC UA
The CODESYS OPC UA server supports the CODESYS user management. You set the access rights on the server from the Access Rights tab on the controller. To do this, select the RuntimeSystemObjects - RemoteConnections - OPCUAServer object.
If anonymous access to the OPC UA Server is permitted despite an active user management, then you can configure the access rights for this access by granting corresponding permissions for the implicitly available group "Anonymous_OPCUAServer". The permission for anonymous access to the OPC UA Server is granted in the Change Communication Policy dialog. For a description of this dialog, see the help page for of Tab: Communication Settings.
Access rights can be checked at both the service and objects levels. As a result, a user might not be able to write to a variable, although this user is generally allowed to write to the OPC UA Server.
OPC UA Service | Permission |
|---|---|
AttributeRead | View |
AttributeWrite | Modify |
Call | Execute |
CreateMonitoredItem | View |
ModifyMonitoredItem | View |
SetMonitoringMode | View |
DeleteMonitoredItem | View |
CloseSession | View |
CreateSubscription | View |
ModifySubscription | View |
SetPublishingMode | View |
DeleteSubscriptions | View |
Publish | View |
Republish | View |
Browse | View |
BrowseNext | View |
TranslateBrowsePathsToNodeIds | View |
RegisterNodes | View |
UnregisterNodes | View |
For more information, see the following: Handling of Device User Management
Using the OPC UA Client to change a variable
In the Address Space view, in the UaExpert client, expand the object.
The variables of the global variable list are visible.
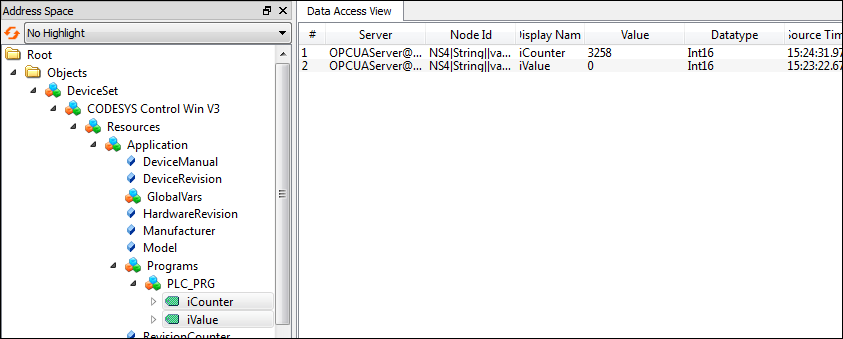
Select the variables and drag them to the Data Access View.
The variables and their current values are shown.

Change the variable values by double-clicking the Value field.
Using events or alarms in the CODESYS project
The CODESYS OPC UA Server provides the capability of sending standard OPC UA events and mapping alarms in a simplified form.
Caution
In CODESYS Communication version 4.6.0.0 (and higher) and CODESYS Development System version 3.5.21.0 (and higher), the ACK_REP acknowledgment method complies with the OPC UA standard.
All other acknowledgment methods do not meet the requirements of the OPC UA specification. In these cases, the state machines in particular are different and no comments can be assigned. The mapping of these alarms is used to provide the possibility of basic interaction between an OPC UA Client and the alarm management.
Create a new project with a CODESYS Control Win controller.
Insert an Alarm configuration object below the application.
Add the library
CmpOPCUAProviderAlarmConfigurationto the Library Manager.In CODESYS Development System version 3.5.21.0 and higher, the
CompatibleAlarmManagerToOpcUaConnectorlibrary must be integrated instead of theCmpOPCUAProviderAlarmConfigurationlibrary.When the library is added, it connects automatically as a client to the alarm configuration and sends the events to the OPC UA Server.
Insert a Symbol Configuration object below the application.
Insert a Visualization object below the Application.
Download the project to the controller and start it.
Alarms are used and generated normally. No special steps are required here.
If you want to create events, then the following additional steps are required.
Insert an AlarmClass object below the Alarm Configuration. Specify a name (example:
Event).The new alarm class opens in the editor.
Select the acknowledgment method REP.
Insert an Alarm Group object below the Alarm Configuration. Specify a name (example:
ApplicationEvent).The new alarm group opens in the editor.
- . Change the following parameters:
Observation type: Event
Class: Event
Message: "Message 1"
In the Program (for example, POU
PLC_PRG), add a program call for triggering the event alarm.AlarmManager.AlarmGlobals.g_AlarmHandler.RaiseEvent(Alm_AlarmConfiguration_Alarmgroup_IDs.ID_ApplicationEvent, Alm_ApplicationEvent_Alarm_IDs.ID_0);
For more information about alarm management and alarm visualization, see the following: Alarm Management and Alarm Visualization
Observing an event via the "UaExpert" OPC UA Client
Start the
UaExpertprogram.Click the command.
The Add Server dialog opens.
In the tree view, expand .
Select the connection type None and click OK to close the dialog.
Click the command.
An object tree is displayed in the Address Space view.
Click the command.
The Add Document dialog opens.
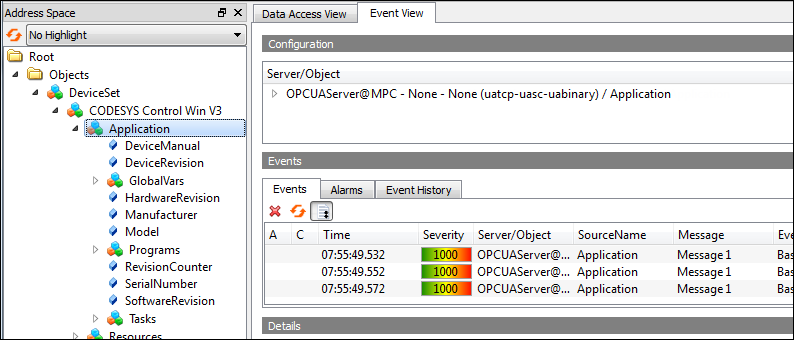
Select the Event View as the "Document Type".
The Event View tab opens.
In the Address Space view, expand the object.
In Address Space, select the "CODESYS Control Win V3" object and drag it to the Event View.
The events are displayed.
